
Little Laughs approach of supplying the full sized photos on cdrom has been a hit (and a money saver) for our clients.
To make the most of your photos, I have included this page to help you with printing and try to answer some common questions.
Hopefully you can make use of this information with both photos by Little Laughs, as well as your own prints from home.
- How big are the files?
I supply the images in Large JPG format. I have printed large 36X20 canvas without any problems. The actual file size does vary depending on the amount of
colors in the photo. Photos can be as small as 2MB or as big as 20MB.
- I tried to print online but the files are too big!
Now that traditional film has been pushed aside for digital. Many companies have set size limitations on files uploaded for printing (to prevent filling servers).
Some places (like Walmart) have an option when uploading to choose
if you are indeed doing larger than 8x10 (in that case the full size will upload),
or if you choose low quality, the files are compressed to save space.
It is important to read the instructions when printing online.
Here is an online image re-sizer if you need to make the images smaller for printing or for online:
http://www.picresize.com/.
- Where do you print?
I print everywhere! That is the best way for me to ensure the photos will print just how I supply them.
Plus it gives me an opportunity to check out special deals, and give my personal reccomendations.
So far one of my favorites for large canvas is: MPIX.COM. They are a USA company,
but do delivery to your door within only a few business days (be ready to pay the duty at the door).
A great local company for canvas printing is "Art Sense", you can reach them by email at
contactartsense@gmail.com.
I have used them to print some larger sized canvas and have been happy with the final product.
- The Print doesn't look like the file!
I have had this happen to my own photos many times, and heard about peoples personal prints having the same problems.
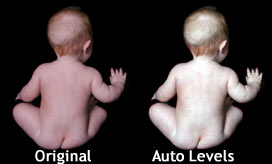
The problem is in the photo labs default settings using "Auto Levels". When the digital photo is sent to the lab, the computer will
automatically look for a black point and a white point to set the "proper" colors. If the photo has a strong black and white point on it,
the photos will be perfect. However, I find with the more artistic styles (with faded white images or soft glow styles etc.) the auto levels
take over and you are left with a print that looks nothing like the original file.

While I do my best in the editing process to prevent that from happening, there are places that do not adjust levels on prints.
London Drugs is usually pretty good at accurate colors, and I have had suggestions to visit mpix.com, as they have a no adjustment price of only $0.19 a print.
Either way, If you are printing photos (be it ones I took or your own from home) Do not settle for improper colors. The printing company should be able to print exactly like your file. So keep that in mind.
- When I print an 8x10, I have to crop off some of the photo. Why?
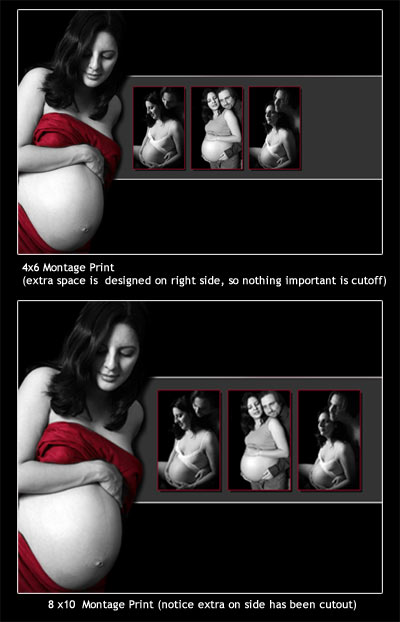
4X6 prints and 8X10 prints have different dimensions (as does 5x7). That is why you need to trim a little off the photo. If you do not want to trim anything, then choose 8x12 and you will not need to crop anything.
In most cases I leave a little extra space in the image, so the large prints have room to trim.
On ALL of my montages I test the file to ensure that it will print as an 8x10 without losing any of the important layout.


